January 21, 2018
Natural Building - The Cob Pizza Oven
I have always wanted to build a pizza oven. When we moved to Metz Meadows, I knew this was something that I wanted to add to the property as quickly as possible. Wood-fired pizza is my favorite. We frequently make this beautiful sourdough (from Chad Robertson at Tartine Bread) and the same dough makes a wonderful pizza crust. I was excited to get the full experience by constructing an oven in which to fire up some pizza at blazing-hot temperatures.
I tend to underestimate the magnitude of projects. The scope of this particular project ended up being vastly greater than I anticipated. It was a pretty massive undertaking. Maybe I hoped for a bit more help from friends and family than I actually ended up getting, or maybe I’m just optimistic. Either way, it was quite a bit more work than I expected.
In this post, I’ll outline my process, point out a few areas that hindsight tells me could have gone better and try to help you set realistic expectations if you’re planning to build a cob pizza oven. At the end, I’ll show you the reward for sticking with it! During the process of writing this, I’m seeing that this project is too large for a single post. That being the case, I’ve decided to break it into three separate posts. First I’ll cover the planning, materials acquisition, and setup. Part 2 will cover the bulk of the construction and part 3 will cover difficulties, troubleshooting, and cooking tips.
Research
As I do with recipes and cooking, rather than using one static recipe, I typically read several different (but similar) recipes and combine and tweak them using the techniques and ingredients that most appeal to me.
My process was no different for this project. My primary source of information was Build Naturally Blog, but I probably read ten or more different sites on the topic.
It was certainly helpful to see the process outlined in photographs from start to finish. After getting a good mental picture of the project, it was time to move into the official planning phase.
Planning
In the planning phase, there were several factors at the front of my mind:
Location - I wanted the oven to be close to the house, obviously. I also understood that this thing would weigh a ton and would need a very strong floor on which to build. Luckily, I was in the process of planning and preparing for my wedding and part of that process involved building a lovely concrete patio just outside my back door. This location met all of my requirements.
Size - There are five people living in my house. We also have frequent family get-togethers and I could foresee cooking tens of pizzas on the same occasion. This made me think bigger was better. I needed to be able to cook at least two 12” pizzas simultaneously. Thinking about design, I also wanted the cooking floor of the oven elevated to a level where reaching in and out of it would be comfortable for me (I’m 6’2”).
Time - This project will take a significant time investment. If you have sufficient help, you might be able to knock out the larger phases of it in a single day, but you also need to take into account the time to acquire materials - driving, waiting for the perfect craigslist ad, etc. - and you will also need to let the oven dry quite a bit before attempting to build a fire in it. All this can amount to weeks or months from start to finish. If you have a deadline for your first pizza party, try to set milestone deadlines along the way to make sure that your first fire does not destroy all of your hard work.
Materials - I knew I needed to construct a pretty tall base if I wanted the cooking surface to be at least three feet off the ground. I decided that I should build a brick base to support the oven. In the planning phase, I decided to keep my eyes open for something suitable. I was pretty open to the exact look I wanted. I will cover materials in the next section, but the planning phase is a good time to start thinking about what you will use for construction. Clay, sand, and straw make up the bulk of the project, but you’ll also need a base, firebrick for the oven floor, a run of stove pipe, and a chimney cap. What do you have easy access to? What is already on location? The answers to these questions can save you a lot of time, money, and energy during the materials acquisition phase.
Materials Acquisition
I needed to have all the necessary materials gathered as I began each phase of construction.
For the base, I decided to go with four complete circles of the 8x8 trapezoidal blocks from Mutual Materials. These guys have retail locations all over the place and a lot of landscape supply stores carry these or similar products. I also needed one layer of the four inch blocks for the top row. These things are pretty heavy in bulk, so I had to make multiple trips to carry them all. If you have a big truck, that will definitely save you some time. Considering these rings of blocks just make an empty cylinder, I needed something to fill it with. I used sand, since there is a ton of it on my land. Then, I needed a layer of firebrick for the top of the base (which was to become the floor of the oven). For this, I kept returning to craigslist over a couple of weeks and searching for firebrick. It wasn’t long until I found a seller near me who had what I needed. I bought extra because I didn’t know how big of an area I needed to cover at the time I found them. You can use anything strong for the base, don’t let my decision limit your imagination!
For the rest of the oven, I needed various mixes of sand, straw, and clay. Luckily, I already had all of these. A buddy of mine had given me the clay two years prior when he dug it out of basement during a remodel. That clay had been sitting in black garbage bags since then. It even moved with me from my old house in anticipation of finally building this thing. I had bales of straw for my chickens, and seats for the wedding. And, as mentioned earlier, there is no shortage of pretty pure sand out in my back pasture. A truckload of sand is pretty reasonable at landscape supply stores. Clay can be pretty hard to source if you’re looking to buy it. Strangely enough, it’s all over the place. There could even be a significant amount in your existing soil. If you’ve done any soil testing, you likely know how much clay your soil contains. If not, here’s a really simple test you can perform with some soil, water, and a mason jar. If there is a significant (doesn’t even need to make up the bulk of it) clay presence in your soil, you will be fine.
Constructing the Base
With the wedding set for late August, I finally got my act–and materials–together and started this thing in mid-July. I would recommend giving yourself much more time if you have a deadline. You will see why in later sections.
I started by measuring the circle created by the trapezoidal blocks and visualizing the final project in the space. I picked the center point, leaving enough room to walk all the way around the completed circle. From here it was just a matter of placing the bricks–each layer offset from the previous–and building up each row, making sure the bricks were snug and secure.
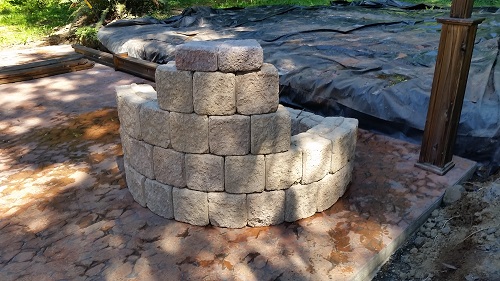
It might have been a good idea to actually mortar the bricks together. I found this out the hard way. After the base was constructed, I was left with a 4-foot tall, empty cylinder. I needed to fill that up with something so that I could position the firebricks as the floor of the oven. I decided to fill the cylinder with sand from my pasture. I also wanted to make sure that sand didn’t just sift out through the gaps between the blocks, so I grabbed a large piece of heavy duty plastic big enough to go all the way up all of the sides and lined the cylinder. I brought tractor bucket after tractor bucket full of sand and begin filling the cylinder, jumping in and packing it down as I went. The immense weight of all of this sand is where the wish for mortar comes in. It was so heavy that it wanted to push the bricks out of place. Knowing that the weight of the oven itself would be enough to hold the bricks in place once it was built, I temporarily supported the structure by holding it in place with a common ratchet tie-down. More solid construction of the base would have avoided this entirely. You can also avoid this problem by constructing a solid base rather than a hollow one that needs to be filled with something.
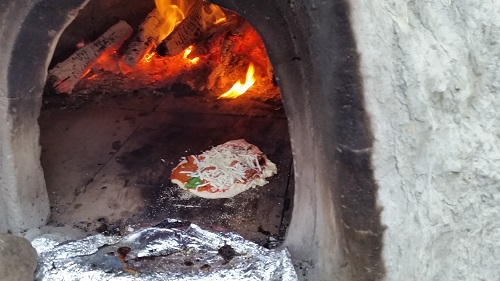
The last step for the base was to build the oven floor out of firebrick. This proved slightly tricky as the space was a circle, and the bricks that I found were not rectangles. They were trapezoidal shapes. The guy I bought them from said that they came from a secret US Government steel mill that had recently been shut down in Utah. Anyway, it was a challenge to figure out how to arrange the bricks to maximize flat cooking surface just inside where the door would be. However you manage this, keep in mind that you’ll be cooking directly on the bricks and want as close to zero clearance between them as possible. Here’s a picture I took later. You can see they firebrick floor under the pizza.
I came back in later with some of my clay mix and shoved it in between any gaps left the shape of the bricks, the brick layout pattern, and the circle shape of the base.
Sand Form
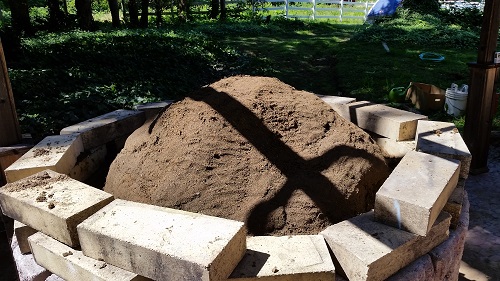
The final stage before constructing the actual oven is to make a sand form which will determine the shape and size of the inside of the oven’s cooking cavity. I wanted a large oven, so I needed a lot of sand for this. I think I recall using 35-50 gallons of sand (in 5-gallon buckets). I didn’t keep track of the exact amount, but it was a lot. This sand should be moistened and formed into a big dome. Remember building sand castles? Same concept. In the picture below, you’ll notice the firebricks laid out on the base. This was to hold it down and in place (I hadn’t yet come up with the ratchet tie-down solution).
I was aiming for a half-sphere dome for the inside of the oven. To measure this, I cut a stick at the length of the radius of the circle and popped it into the center of the growing dome. I also made an effort to make the dome go straight up as much as possible around the edges.
You’ll have to experiment to figure out the right amount of water to add to the sand to get it to hold its shape.
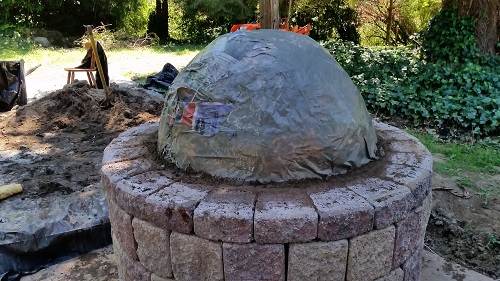
The last thing I did with the sand dome is cover it with several layers of wet newspaper. This provides a clear boundary between dome and oven. Later, when you’re hollowing out the sand from the oven cavity, this layer is the main indicator to stop digging. Without it, you might start digging into your clay wall and diminish the thickness of that layer. Here’s what it looked like, all ready to go:
Coming Soon:
In an upcoming post, I’ll move on to the mixing of materials and construction of the oven itself. Stay tuned!
~Patrick